BIKIN SPRINTFeatures
Projects & templates
Create a project from a template, then set up its statuses, labels, features (sprints, time tracking, custom fields and more), members and state in BIKIN SPRINT.
A project holds a piece of work: one campaign, one production, one release, one event or one group assignment. Each project has its own board, list, summary and settings.
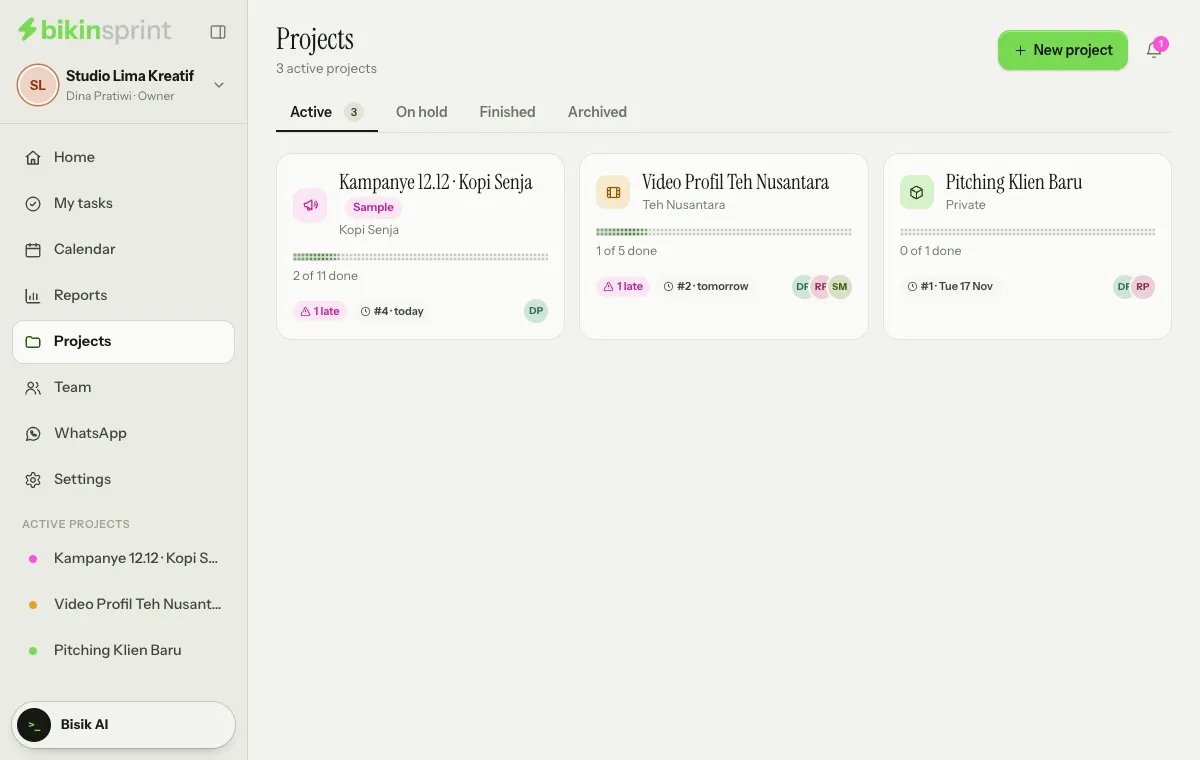
The Projects page in the sidebar holds every project you may see, split into the Active, On hold, Finished and Archived tabs. Each card shows the client (or Private for a private project), task progress, how many are overdue, the next due date and the members.
Creating a project
- Open Projects in the sidebar, then choose + New project at the top right.
- Enter the Project name and, if there is one, the Client (optional).
- Pick a Template (see below). Agency / creative is selected to begin with.
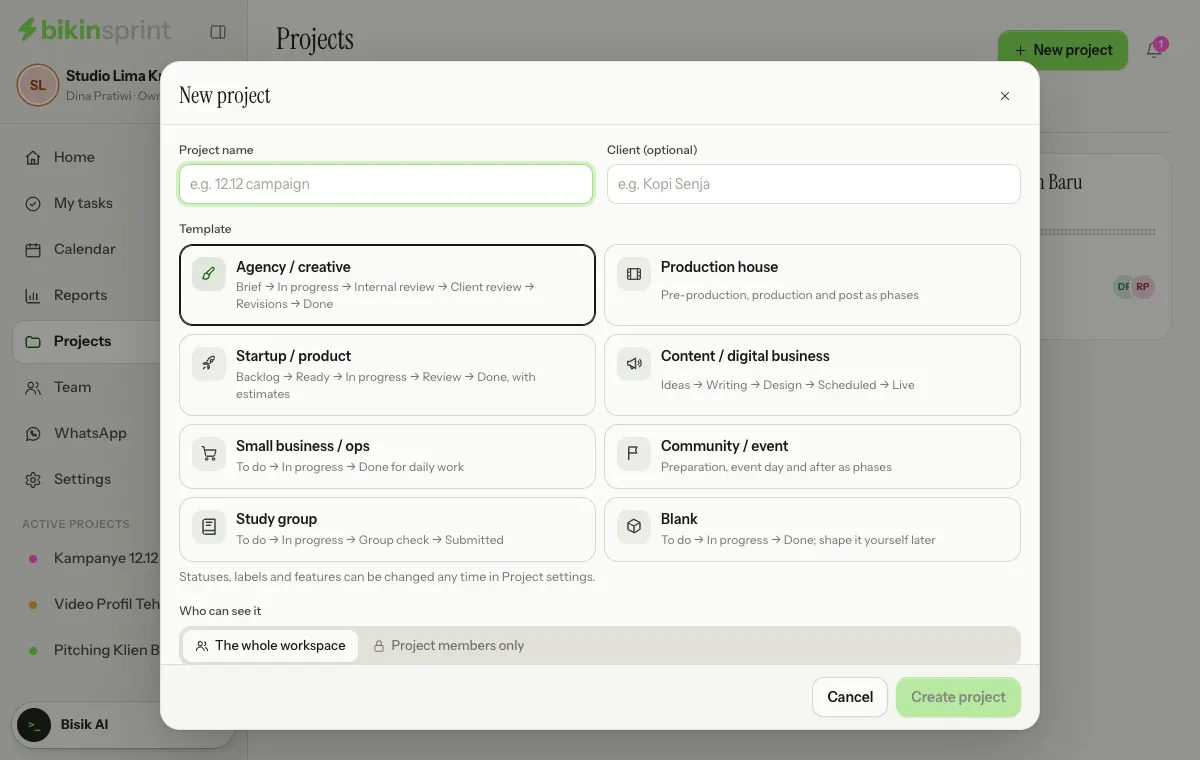
- Choose Who can see it: The whole workspace or Project members only, then pick the Project members if needed.
- Add the Start (optional) and Target end (optional) dates if you have them, then choose Create project. The project opens straight on its Board tab.
The owner and admins can limit project creation to the owner and admins in Settings › Workspace. When it's limited, members don't see the + New project button.
Templates
A template sets up statuses, labels and features that fit the work. You can change all of it later.
| Template | Default statuses | What it sets up |
|---|---|---|
| Agency / creative | Brief → In progress → Internal review → Client review → Revisions → Done | Instagram, TikTok, Web and Print labels |
| Production house | To do → Doing → Done | Pre-production, production and post-production phases |
| Startup / product | Backlog → Ready → In progress → Review → Done | Sprints, estimates; Bug, Feature and Design labels |
| Content / digital business | Ideas → Writing → Design → Scheduled → Live | Instagram, TikTok, YouTube and Blog labels |
| Small business / ops | To do → In progress → Done | Store, Stock and Admin labels |
| Community / event | To do → Doing → Done | Preparation, event day and after-the-event phases |
| Study group | To do → In progress → Group check → Submitted | Paper, Slides and Research labels |
| Blank | To do → In progress → Done | Shape it yourself later |
The project page
The project header shows the project name, the client and how many tasks are done. At its top right are Share, which opens the client link (project managers, admins and the owner only), and + Task, which opens the full new-task form. The project's important links show as chips under the title, followed by the tabs.
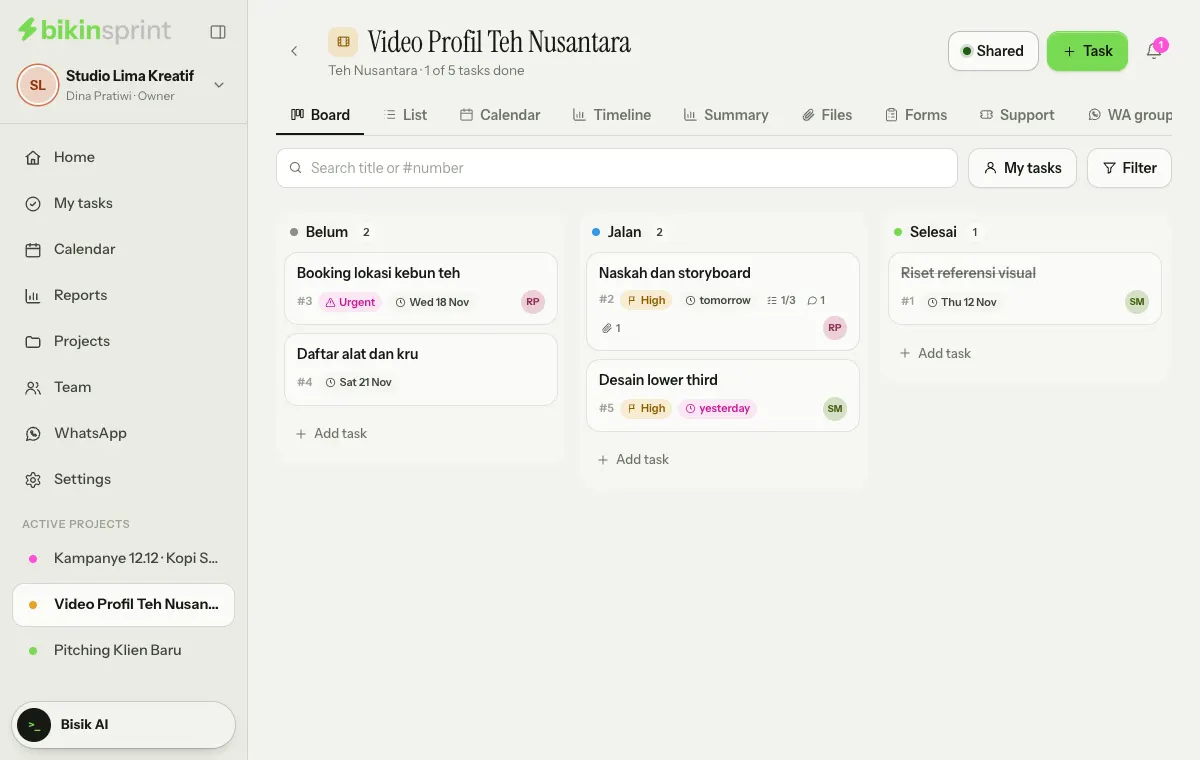
Each project has the tabs below. Tabs for features you don't use stay hidden: Sprint appears when that feature is on, Forms and Support disappear when switched off, WA groups still shows with a lock if your plan doesn't include WhatsApp groups yet, and Settings is only for project managers, admins and the owner.
- Board: a column per status, where task cards move. See Board, list & My tasks.
- List: tasks grouped by status, sortable by due date or priority.
- Calendar: tasks with a due date, by month.
- Timeline: tasks as bars from their start date to their due date.
- Sprint: shown when the Sprints feature is on. See Sprints and burndown.
- Summary: four headline numbers (progress, open, overdue, done in 7 days), the next seven days of due dates, tasks per status with the schedule pace (time elapsed against work done), workload per person with the priority of open tasks, and recent activity.
- Files: every attachment and link from the project's tasks in one place, searchable and filterable; Add attaches a file or link straight to a task.
- Forms: forms the client fills in on the client link. See Forms.
- Support: tickets for requests and problems from the client or the team. See Support.
- WA groups: the WhatsApp groups linked to the project. See WhatsApp groups.
- Settings: info, members, statuses, labels, features and the project's state.
Above the board and the list there's a Search title or #number box (type a number such as 12 or #12 to jump to that task), a My tasks button to see only your tasks, and Filter by assignee, label, priority or sprint; choose Apply to use it or Clear to reset it. On the Forms and Support tabs, the + Task button gives way to that tab's own main button.
Project settings
Project managers, admins and the owner manage a project from its Settings tab, the last tab in the project header. Each card has its own save button, such as Save statuses or Save labels:
- Project info: name, client, short brief, icon and colour, start and target end dates, who can see it, and Important links (up to eight, for example a staging site, Figma or a shared folder; addresses start with https://) shown in the project header and on the client link.
- Members and managers: managers run the project; project members are the ones kept informed about it.
- Status: the board's columns. Rename, recolour and reorder them with the up and down arrows, or add new ones with + Status (two to twelve statuses). Each status has a category, To do, In progress or Done, which drives progress; at least one status must be in the Done category. Tasks in a deleted status move to another status of the same category. Tap Needs review on a status row to make it a review status: its column is marked needs review on the board and drives client approvals. The Agency / creative and Startup / product templates come with them ready (such as Client review).
- Label: card markers, for example channels or kinds of work. In quick add, type
#label. - Project features: turn on only what you use: Sprints (short rounds of work with a backlog and a burndown), Phases (group tasks into big stages), Estimates (points or hours per task), Time tracking (time worked per task, see Task details), Custom fields (your own fields on every task, see below), Recurring tasks, Dependencies, Forms and Support (the last two start on). Features that aren't part of your plan are marked Upgrade and can't be switched on.
- Project state: Active, On hold, Finished or Archived, in the same card as the Delete project button.
Sprints and burndown
Sprints split the work into short rounds, usually two weeks. Turn on Sprints under Project features (the Startup template already does), then open the Sprint tab.
- Plan: a project manager chooses New sprint and adds a goal (optional) and the dates. A sprint lasts one to 31 days; the 1–4 wk buttons fill in the end date. Leave the name empty for the next number, for example Sprint 4.
- Fill it: on the Backlog card, press + on the tasks you'll work on. Press − on the In this sprint card to send one back. You can also pick the sprint in a task's details, or add a new task straight into the sprint with the Task button on the sprint's card.
- Start: a manager presses Start sprint. A project runs one sprint at a time.
- Follow the burndown: the solid line is the work left at the end of each day, the dashed line is the ideal line going evenly down to zero. Work is counted in estimate points when the project uses Estimates, otherwise in number of tasks. Tasks added mid-sprint make the line go up. Point at or touch the chart for the numbers, or open See the numbers per day.
- Complete: a manager presses Complete sprint and picks where unfinished tasks go: the Backlog, a planned sprint, or A new sprint of the same length. The burndown and its numbers are kept with the sprint.
Deleting a sprint doesn't delete its tasks; they all go back to the backlog. On the board and the list, Filter can show one sprint or the backlog only.
Custom fields
Turn on Custom fields under Project features, then set up the fields in the same place: give each one a name, pick its type (Text, Number, Date, Choice or Checkbox), and for Choice type the choices separated by commas. A project can have up to 20 fields, in the order you set. Choose Save fields.
The fields show on every task in that project and are included in the CSV export, one column per field.
State and archive
Active and On hold projects count towards your plan's project limit. Finished and Archived projects stay readable for everyone who may see them, but only managers, admins and the owner can change them, for example to make them active again. Archive finished projects to keep the list short; they move to the Archived tab on the Projects page.
Deleting a project
A project manager, an admin or the owner can delete a project with Delete project in the Project state card of its Settings tab. Every task, comment, attachment and history entry is deleted for good, and this step asks for a code from your email. If in doubt, archive it instead.
Last updated: